Clearing Fine Dust Post-Renovation
Cleaning up after a renovation is not just about aesthetics; it’s crucial for your health and indoor air quality. A well-executed cleanup can transform your space from dusty and uncomfortable to fresh and welcoming. Let's explore how to achieve a spotless finish while prioritizing safety and efficiency.
What You Will Learn
- The importance of post-renovation cleaning for improving indoor air quality and safeguarding health.
- Essential safety gear to wear during cleanup, including dust masks, gloves, and eye protection.
- Effective techniques for containing dust during the cleanup process, such as sealing off rooms and using dust barriers.
- How proper ventilation can significantly enhance air quality after renovations.
- The benefits of using a HEPA vacuum for removing fine dust and where to focus your vacuuming efforts.
- The technique of damp wiping with microfiber cloths for effective surface dust removal.
- Best practices for mopping floors to complete the cleanup process and ensure a sparkling finish.
- The importance of inspecting cleaned areas to achieve thorough dust removal.
Step-by-Step Guide to Effective Dust Removal
This guide outlines the essential steps for thorough dust removal after renovation to ensure a clean and healthy living environment. For more detailed insights into maintaining a pristine home, consider these essential deep cleaning tasks.
1. Containing Dust
- Seal off rooms with plastic sheeting.
- Use dust barriers to prevent spread.
- Close vents to limit dust recirculation.
2. Ventilation
Open windows and use fans to circulate fresh air and dilute dust particles.
3. Vacuuming with HEPA Filters
- Focus on floors, baseboards, and upholstery.
4. Damp Wiping
Use damp microfiber cloths to trap dust on surfaces like countertops and tables.
5. Mopping Floors
- Use a clean mop head and change water frequently.
6. Inspecting and Repeating
Inspect cleaned areas and repeat steps as necessary for complete dust removal.
Essential Strategies for Removing Fine Dust After Renovation Work
Understanding the Importance of Post-Renovation Cleaning
After a renovation, it’s crucial to engage in a thorough cleanup. This isn't just about aesthetics; it’s about improving indoor air quality and safeguarding your health. Dust and debris can linger long after the workers have left, potentially leading to respiratory issues and other health problems.
By dedicating time to a detailed cleaning, you create a safer, more welcoming space. Think about it: you want your newly renovated home to feel fresh and vibrant, not dusty and uncomfortable! It’s all about making your living environment as inviting as possible for you and your loved ones.
Preparing for the Cleanup Process: Safety First
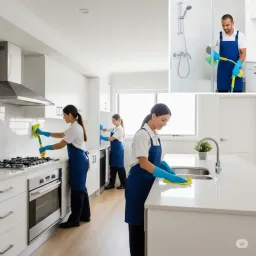
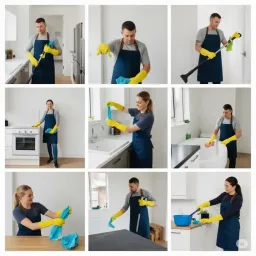
Before diving into the cleanup, safety should be your top priority! Equip yourself with the necessary safety gear to protect yourself from dust and potential irritants. You’ll want to have:
- Dust masks to prevent inhalation of fine particles.
- Gloves to protect your hands from harsh cleaning agents.
- Eye protection to shield your eyes from flying dust.
Wearing this gear ensures that you can focus on the task at hand without worrying about your health. Remember, at My Spotless Space, we prioritize safety alongside achieving that spotless finish, so it’s an essential step for all cleaning projects! For more tips on keeping your space pristine, check out our guide on keeping your space spotless.
Step-by-Step Guide to Effective Dust Removal
1. Containing Dust: Effective Dust Management Techniques
A crucial part of post-renovation cleaning involves containing the dust created during the process. This can prevent dust from spreading to other areas of your home. Here are some effective techniques:
- Seal off rooms where renovation work took place using plastic sheeting.
- Use dust barriers to create a controlled environment for cleanup.
- Close vents in affected areas to limit dust recirculation.
By adopting these strategies, you can significantly reduce dust spread and make your cleanup process much more manageable. Trust me, a little effort in managing dust early on pays off later!
2. Ventilation: Ensuring Fresh Air Circulation
Once the renovation is complete, it’s time to ventilate the space. Opening windows and doors allows fresh air to flow through, which helps dilute and carry away dust particles. This is vital for improving the overall air quality!
Consider running fans to enhance circulation, and if you have an air purifier, turn it on to help filter out any persistent dust. Proper ventilation makes a significant difference in creating a clean atmosphere.
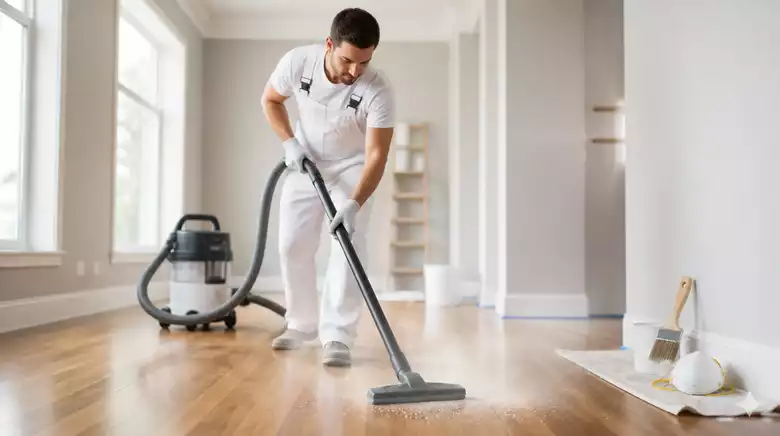
3. Vacuuming with HEPA Filters: The First Line of Defense
Vacuuming is one of the most effective methods for removing fine dust. But not just any vacuum will do; a HEPA vacuum is your best friend in this battle! These vacuums are designed to trap tiny particles, ensuring they don’t escape back into the air.
When vacuuming, make sure to focus on:
- Floors – Carpets and hard surfaces alike need attention.
- Baseboards – Dust tends to settle here, so don’t overlook them.
- Upholstery – Use the appropriate attachment to reach couches and chairs.
With the right techniques, you can achieve a tremendous reduction in dust levels, setting the stage for a truly spotless space. You might also find our tips on how to deep clean your renovated spaces particularly useful.
4. Damp Wiping: Techniques for Surface Dust Removal
After vacuuming, it’s time to tackle surfaces with some damp wiping. Using barely damp microfiber cloths is the key. Why microfiber? Because it effectively traps dust instead of just pushing it around!
When wiping down surfaces, focus on high-touch areas such as:
- Countertops
- Tables
- Shelves
Make sure to avoid soaking the cloth; too much water can cause dust to turn into mud, making your job more challenging. Keep it light, and you’ll be amazed at how well this method works!
5. Mopping Floors: Finalizing the Cleanup Process
Once you've dusted surfaces, it’s time to mop the floors. A clean floor contributes significantly to the overall cleanliness of your space. For best results, use a wet mop along with a suitable cleaning solution designed for your floor type.
Here are some best practices to ensure a thorough mopping:
- Use a clean mop head to avoid redistributing dirt.
- Change water frequently to keep cleaning effective.
- Pay special attention to corners where dust tends to settle.
By mopping effectively, you’ll create a sparkling finish that complements your newly renovated home!
6. Inspecting and Repeating: Ensuring Complete Dust Removal
Finally, once you think you’re done, don’t forget to inspect your work. Walk through each cleaned area and look for any remaining dust. If you spot it, don’t hesitate to go over those areas again!
Sometimes, dust likes to hide in unexpected places, so repeating the cleaning steps can ensure that your space is truly pristine. A meticulous approach leads to the best outcomes and helps you enjoy your beautiful new environment to the fullest!
Pro Tip
For an extra layer of protection, consider using an air purifier while you clean. This can help capture airborne dust particles and allergens, ensuring that you're not just cleaning the surfaces but also improving the overall air quality in your home.
Closing Thoughts on Effective Dust Removal After Renovation
Cleaning up after renovation work can feel overwhelming, but it’s crucial for creating a healthy living environment. Following a structured cleanup strategy not only helps remove dust but also improves indoor air quality. Remember, a clean space is vital for your well-being, especially after the disruptions that come with renovations!
By taking the time to implement these cleaning techniques, you can ensure that your home remains safe and comfortable. Whether you're tackling the project yourself or considering professional assistance from My Spotless Space, the goal is to create a dust-free haven that welcomes you and your loved ones. For tips on managing larger waste, don't forget about effortless junk removal.
Frequently Asked Questions About Post-Renovation Dust Cleanup
Many homeowners have questions about the best practices for dust cleanup after renovations. Here are some common queries that might help:
- What cleaning products should I use? Opt for non-toxic, eco-friendly cleaners that won't introduce harmful chemicals into your home.
- How soon can I start cleaning after the renovation? Ideally, wait a few hours to allow for any settling dust. It's best to clean when the air is still!
- Are there safety measures I should consider? Always wear protective gear like masks and goggles, especially if sensitive materials were involved in the renovation.
- Why is post-renovation cleaning so important? It's crucial for improving indoor air quality, safeguarding your health, and transforming your space from dusty to fresh.
- What are the essential safety items for post-renovation cleanup? You should wear dust masks, gloves, and eye protection to protect yourself from fine particles and irritants.
- How can I prevent dust from spreading during cleanup? Seal off rooms with plastic sheeting, use dust barriers, and close vents to contain dust effectively.
- What type of vacuum is recommended for post-renovation dust? A HEPA vacuum is highly recommended as it's designed to trap tiny particles and prevent them from re-entering the air.
- What's the best way to clean surfaces after vacuuming? Use barely damp microfiber cloths for damp wiping, as microfiber effectively traps dust without pushing it around.
Addressing these questions can help you feel more prepared for the cleanup process.
Tools and Products Checklist for Successful Cleanup
To make your post-renovation cleanup seamless, here’s a handy checklist of essential tools and products:
- HEPA vacuum cleaner
- Microfiber cloths (dampened and dry)
- Wet mop and bucket
- Eco-friendly cleaning solutions
- Protective gear: masks, gloves, goggles
- Trash bags for debris disposal
Having these items ready can make your cleanup much more efficient. Plus, if you ever find yourself needing extra hands, remember that My Spotless Space is just a call away!
Mistakes to Avoid During Post-Renovation Cleaning
While tackling dust removal, it’s easy to make a few common mistakes. Here are some pitfalls to avoid:
- Not sealing off rooms: Make sure to contain dust to one area to prevent it from spreading.
- Using dry cloths for dusting: This can cause more dust to become airborne rather than eliminated.
- Skipping ventilation: Always air out the space to reduce lingering dust particles.
- Neglecting to inspect: Double-check areas you cleaned to ensure no dust remains.
By steering clear of these mistakes, you’ll achieve a more thorough cleaning experience!
Safety Measures: Protecting Your Health During Cleanup
Your health is paramount when tackling dust after renovations. Here are essential safety measures to keep in mind:
- Wear a quality dust mask to protect your lungs from fine particles.
- Use goggles to shield your eyes from dust and debris.
- Consider gloves to protect your hands from chemicals and irritants.
Taking these precautions can significantly reduce health risks while you clean.
Call to Action: Start Your Dust-Free Journey Today
Ready to dive into a spotless space? Implement the steps we’ve discussed, and transform your environment into a dust-free zone! I invite you to share your experiences, ask questions, or offer tips in the comments below. Together, let's create cleaner, healthier homes!
Recap of Key Points
Here is a quick recap of the important points discussed in the article:
- Post-Renovation Cleaning is Essential: It improves indoor air quality and ensures a healthy living environment.
- Safety Gear is a Must: Equip yourself with dust masks, gloves, and eye protection before starting the cleanup.
- Dust Containment Techniques: Seal off rooms, use dust barriers, and close vents to limit dust spread during cleaning.
- Ventilation is Key: Open windows, use fans, and activate air purifiers to enhance air circulation and reduce dust particles.
- HEPA Vacuums for Effective Dust Removal: Use HEPA vacuums to capture fine dust from floors, baseboards, and upholstery.
- Damp Wiping for Surface Cleaning: Use barely damp microfiber cloths to effectively trap dust on surfaces.
- Mopping Floors: Mop with a clean mop head and change water frequently for optimal cleanliness.
- Inspect and Repeat: Always check your work and repeat cleaning steps if necessary to ensure thorough dust removal.